
Hosting a meeting
You become the host — technically the room's owner — the moment you create a meeting. That gives you the moderation controls, the access settings and the ability to issue interpreter links.
You need an account with creation rights
Only logged-in accounts can create meetings, and the right is granted individually by an administrator. If you see a Login button instead of Create Meeting, or the button is disabled, ask whoever runs your installation to enable it for your account.
Creating a meeting
Click Create Meeting on the home page. The setup window opens and asks four things.
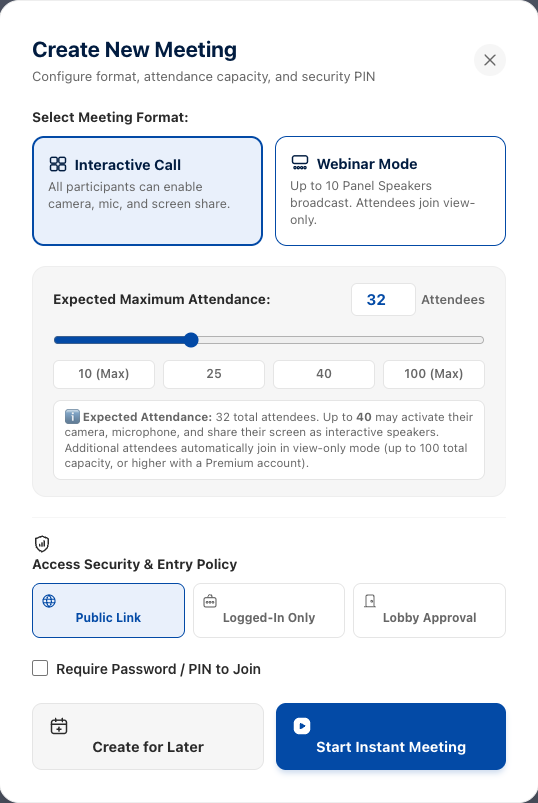
1. The format
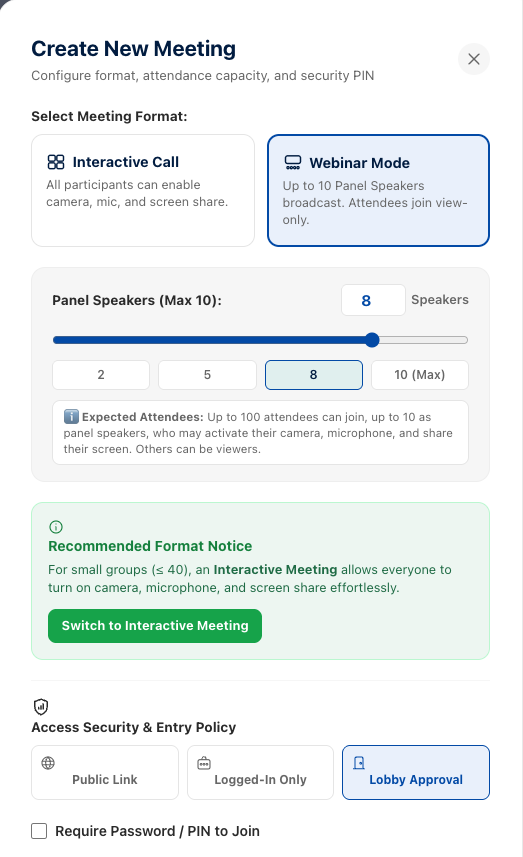
Interactive Call is the normal round-table meeting: everyone can turn on their camera, microphone and screen share. Webinar Mode puts a panel of up to ten speakers in front of an audience that joins view-only. See webinar mode.
2. Expected attendance
A slider with quick presets. This sets the room's capacity, and the note underneath spells out exactly what the number means — how many people may use camera and microphone, and what happens to anyone beyond that. In Webinar Mode the same control becomes Panel Speakers (Max 10).
3. Access security and entry policy
Three mutually exclusive choices:
| Option | Who gets in |
|---|---|
| Public Link | Anyone with the link. No account, no approval. The most common choice. |
| Logged-In Only | Only people with an account who are signed in. A guest with no account is turned away. |
| Lobby Approval | Everyone waits until you let them in one by one. See running a lobby. |
4. A password, if you want one
Tick Require Password / PIN to Join and set one. Guests are asked for it when they join. Interpreters holding a signed link bypass it automatically.
Finally, choose Start Instant Meeting to go straight in, or Create for Later to schedule it.
Scheduling for later
Create for Later opens a second step for the date and time. The configuration you just chose is carried forward and summarised at the bottom, so you can confirm it before committing.
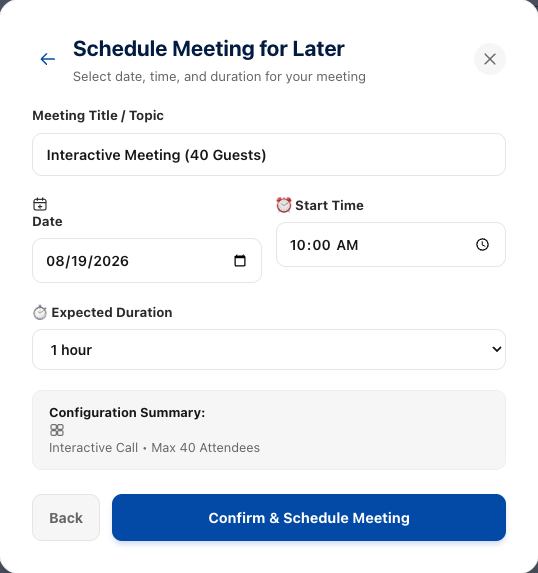
The duration here is planning information, nothing more
The duration you pick is what people see on the invitation and in the calendar entry. Nothing stops a meeting running longer or shorter, and scheduling a meeting you later abandon has no consequence at all.
Your meeting is ready
However you created it, you land on a confirmation screen with everything you need to send out.
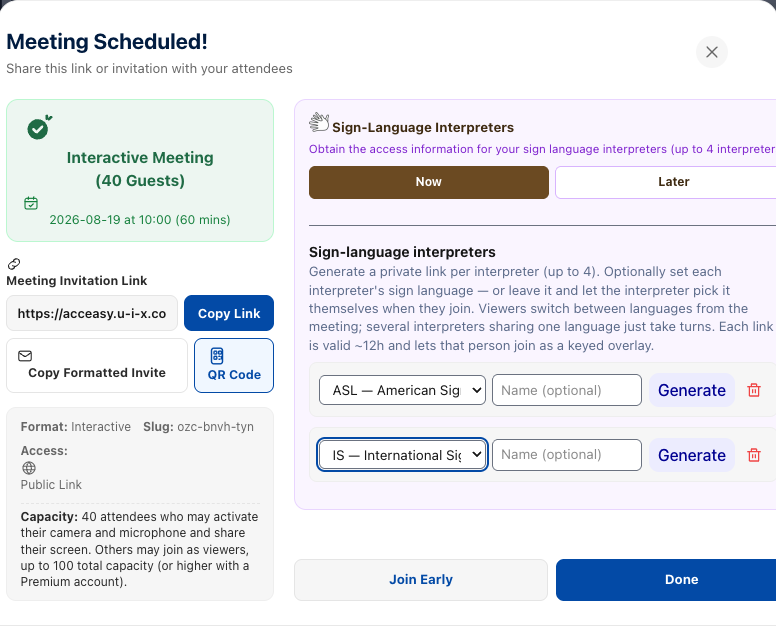
What each option gives you:
| Action | What it copies |
|---|---|
| Copy Link |
Just the room address,
https://acceasy.u-i-x.com/xxx-xxxx-xxx. Usually
all you need.
|
| Copy Formatted Invite | A complete, ready-to-paste invitation: meeting name, date and time with the timezone stated, the link, calendar links, and the security PIN if there is one. It keeps its formatting in email and chat, and falls back to plain text where it cannot. |
| QR Code | A scannable code — handy for getting people in from a phone in the room. |
| Calendar links | One-click Add to Google Calendar and Add to Outlook links, with the timezone set correctly. |
Inviting people in other countries
Use Copy Formatted Invite rather than typing the time yourself. It states your timezone and the UTC equivalent, which is what stops a Bogotá 10:00 being read as 10:00 in Madrid.
Your meetings dashboard
Every meeting you create is listed on your home page while you are logged in.
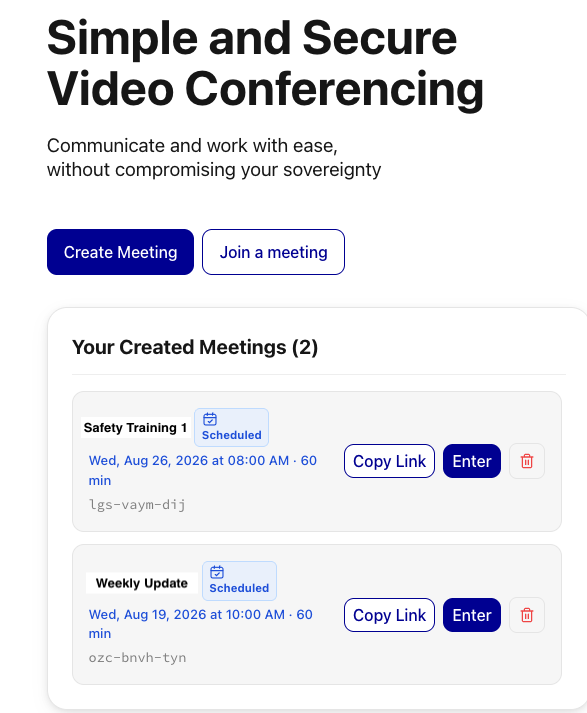
- Enter — jump straight into that room.
- Copy Link — grab the address to share again.
- Delete — the trash icon removes the room permanently, from your account and the server.
Rooms are permanent — reuse them
A meeting link never expires and can be reused as often as you like. Creating and keeping rooms costs nothing, so there is no reason to delete one you might want again.
Inviting people once the meeting is running
Inside the meeting, open the Share & Interpreter Invites button in your control bar. It is icon-only, and only hosts and admins can see it.
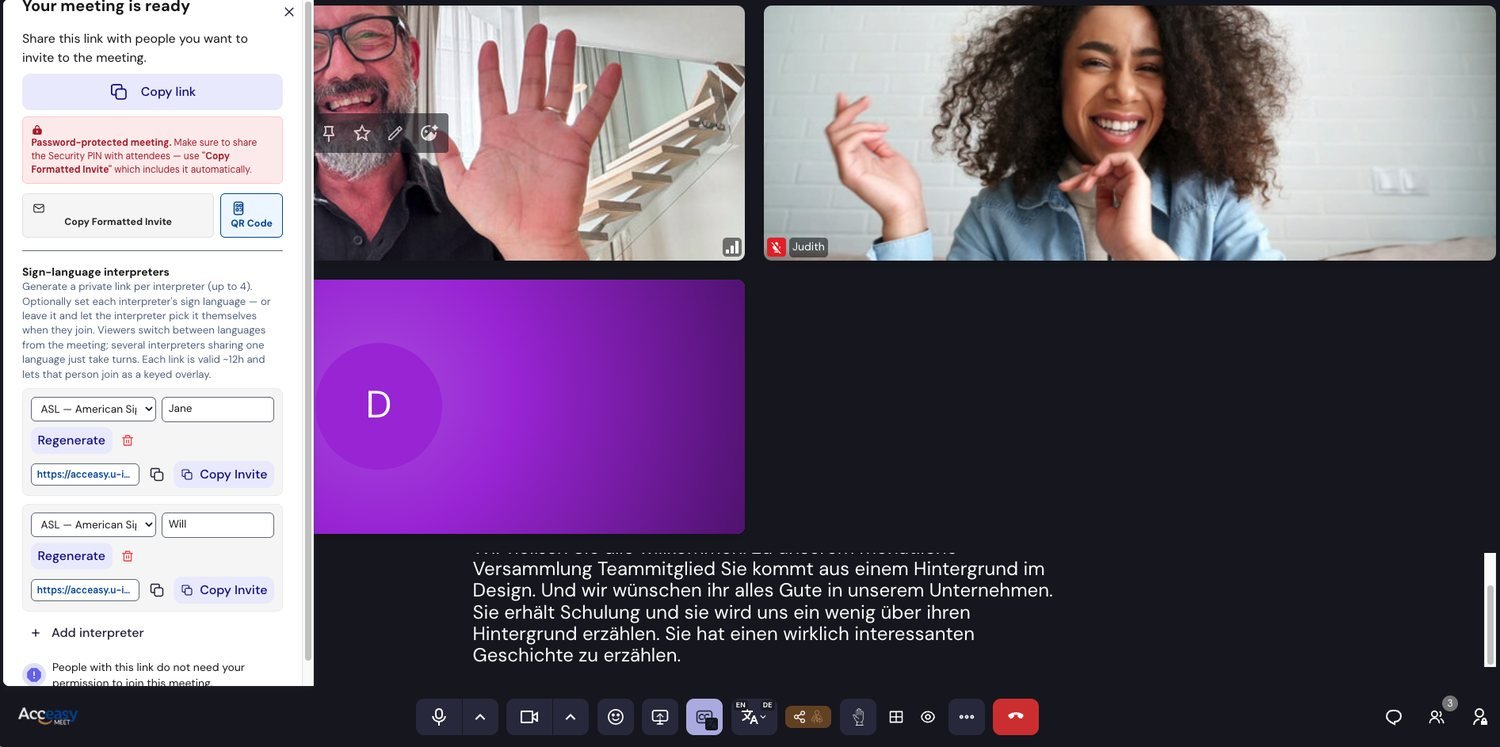
The red notice appears whenever the meeting is password-protected, reminding you to send the PIN — Copy Formatted Invite includes it automatically. A different notice appears when the room is open to anyone with the link, so you are never unclear about which one you are sending.
Phone dial-in is not available on this installation — there is no “Call / Code” block, and that is expected rather than a fault.
Choosing who can join
You set this when creating the meeting, and can change it at any time from the host settings panel inside the room. The three levels are the same ones described above; inside the meeting they are named Open, Open to trusted people and Restricted.
The link never changes — what it admits does
This trips people up. The room link is only the room's address; it does not carry an access level. Access is checked freshly every time somebody clicks it. So:
- The same link keeps working whatever you set the access level to.
- Loosening it (Restricted → Open) means the link you already sent now lets guests in as well, including people who never asked.
- Tightening it mid-meeting (Open → Restricted) does not remove anyone: access is only checked at the moment of joining, not continuously. New arrivals are held to the stricter rule. To get someone out immediately, remove them — see moderating.
A common pattern
Leave a recurring meeting Open so nobody has to ask each week, flip it to Restricted for a one-off sensitive conversation, then flip it back.
Running a lobby
In a Restricted room, anyone who is not already a member sees Requesting to join… and waits. You get a notification and a Waiting room section in the participants panel.
- Accept or Deny each person individually, or
- Accept all / Deny all when a group arrives at once.
Each arrival also raises a pop-up notification with Accept built into it, so you do not have to dig through the participants panel mid-conversation.
If nobody responds within 10 minutes, the person waiting is told that no one responded. Reloading while they wait does not lose their place in the queue.
Moderating a meeting
Controls that apply to the whole room
Open the host settings panel from your control bar. Four toggles affect every non-host participant the instant you flip them — they are pushed the change immediately and shown a message explaining what happened.
| Toggle | When switched off |
|---|---|
| Turn on microphone | Participants cannot unmute themselves. |
| Enable video | Participants cannot turn their camera on. |
| Share their screen | Nobody but you can share — and anyone mid-share stops immediately. |
| Mute others | Only hosts can mute people. When on, any participant can mute another. |
Controls for one person
Open a participant's ⋯ menu, either from their video tile or from the participants list.
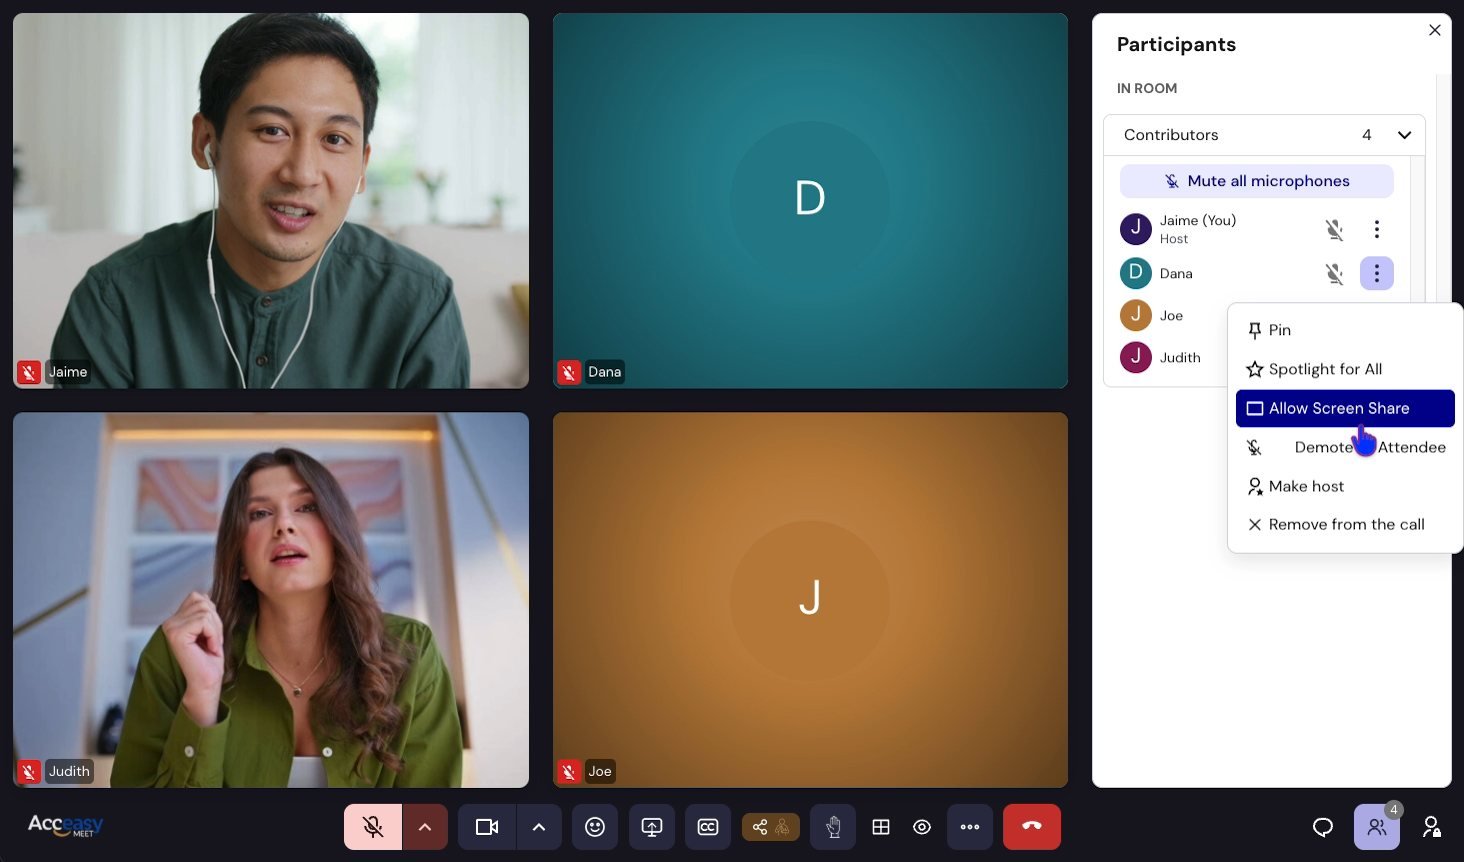
Spotlight for All
Puts that person on everyone's stage. You can spotlight up to two people at once — an interpreter alongside the active speaker, for instance — and the menu then offers Remove Spotlight. It applies to everyone in the meeting including people who join later, and you can spotlight yourself.
Viewers are not locked: they can still change their own layout and move tiles. Only hosts can set a spotlight; the meeting ignores one sent by anybody else.
Make host
Gives someone the same in-meeting powers you have, effective immediately with no rejoin.
Guests can be hosts too
A signed-in participant keeps the role on the room afterwards; a guest holds it for the rest of this meeting (if they drop out and come back as a new participant, make them host again). Guest hosts can do everything a host can except send email invitations and create interpreter links, which need an account.
The rest
- Pin — features them on your own screen only.
- Allow Screen Share / Demote to Attendee — speaker rights, mainly used in webinars.
- Remove from the call.
- Mute one person's microphone, lower one person's raised hand, or lower everyone's at once.
Ending the meeting
When you leave as host you are asked whether you want to leave yourself or end it for everyone. Ending disconnects all participants at once. Either way the room survives — the same link works again next time.
Recording and transcript export
Both are administrator-only, and both are switched off on this installation, so nobody sees those controls here. Live captions are a separate feature and are available. Where recording is enabled elsewhere, note that participants get a persistent “recording in progress” banner but no consent prompt, and a sign-language interpreter is captured on their raw green screen rather than composited as viewers see them.
Meetings in two languages
Set it once at the start of the meeting, and there is nothing left to moderate on that front: nobody needs to be given the floor to switch languages, nobody has to wait their turn to speak, and people just talk.
-
Open the CC button in the control bar, then the caption language button beside it.
-
In the Spoken in column, choose the two languages people will actually speak.
-
Tell participants to pick their own language in the Read in column — that is all they need to do.
-
If one person keeps being captioned in the wrong language, open the ⋯ menu beside their name and set Spoken language for them, instead of leaving it on Automatic.
Say it out loud at the start
Tell the room, in plain words: “speak your own language, and read the captions in yours.” That one sentence is usually all the explanation guests need — nobody has to ask how it works mid-meeting.
See meetings with two spoken languages for what participants see on their side. Pick two languages only if two are genuinely going to be spoken — a second language also gives the recognition engine more chances to mishear background noise as speech.
Webinar mode
For a talk, briefing or class rather than a round-table discussion. Everyone joins as a viewer: they can watch, hear, read captions, see sign-language interpreters and use chat, but their camera and microphone are off and they cannot turn them on.
| Interactive | Webinar | |
|---|---|---|
| Who can use camera & microphone | Everyone | The panel only |
| Panel size | — | Up to 10 |
| Total attendees | Everyone, up to the room's capacity | Up to 100 |
Promoting someone mid-meeting
Open their ⋯ menu and choose Grant Speaker Rights (Camera & Mic). Their controls unlock instantly and they are notified — no rejoin needed. Demote to Attendee reverses it. If the panel is already full you get a clear error rather than a silent failure; demote someone first.
Interpreters are not viewers
A sign-language interpreter joining with their signed link keeps the ability to publish video even in a webinar. You do not need to promote them, and they do not count against your panel of ten — they appear as the usual floating overlay.
Inviting sign-language interpreters
This is the feature the whole product is built around. Interpreter invitations come from the same panel as ordinary invitations — either the Sign-Language Interpreters section on the confirmation screen, or Share & Interpreter Invites inside a live meeting.
What you are generating
A private link, unique to one interpreter, carrying a signed authorisation token. It lets that person:
- appear as a floating, background-removed overlay for everyone, instead of a regular grid tile;
- stay hidden from the participant grid until they choose to appear;
- be tagged with a sign language, so viewers can find and toggle them;
- bypass the room password and the waiting room entirely.
You can generate up to four per room, for a team.
Filling in a slot
Each slot has two optional fields:
- Sign language — pick one if you already know it. You can equally leave it blank and let the interpreter choose when they join. The interpreter's own choice always wins, so a wrong guess here is harmless.
- Name — mainly useful for telling apart two interpreters covering the same language in a relay.
Click Generate and the link appears in a field beside a copy button. It is long — that is the signed credential inside it — so it sits in a scrollable field rather than sprawling across the dialog. Copy Invite beside it copies a complete formatted invitation for that one interpreter, including the reassurance that no password is needed.
Links expire after about 12 hours
If a meeting is rescheduled, or runs past that window, generate a fresh link from the same panel. Generated slots persist for your room, so you can view, copy or regenerate at any time — including during a live call.
Your interpreter then calibrates privately and chooses when to appear — the whole process is covered in the interpreter guide. Once they go live, a Language button appears automatically in everyone's control bar.