
Joining a meeting
You do not need an account, an app or an invitation code beyond the link itself. Open the link in a browser and you are in.
Joining a meeting
There are two ways in:
-
Open the link someone sent you. It looks like
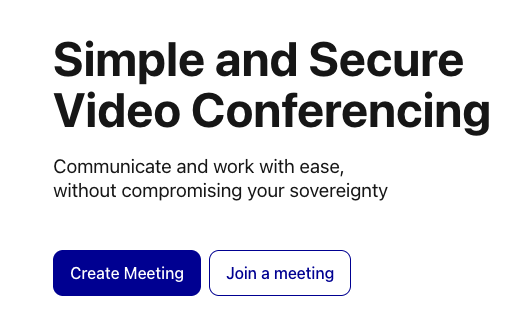
https://acceasy.u-i-x.com/xxx-xxxx-xxx. - Type the meeting code. On the homepage, choose Join a meeting and paste the link or the ten-letter code.
The pre-join screen
Before you enter the call you get a chance to check how you will look and sound. Your browser will ask permission to use your camera and microphone — you have to allow it for other people to see or hear you.
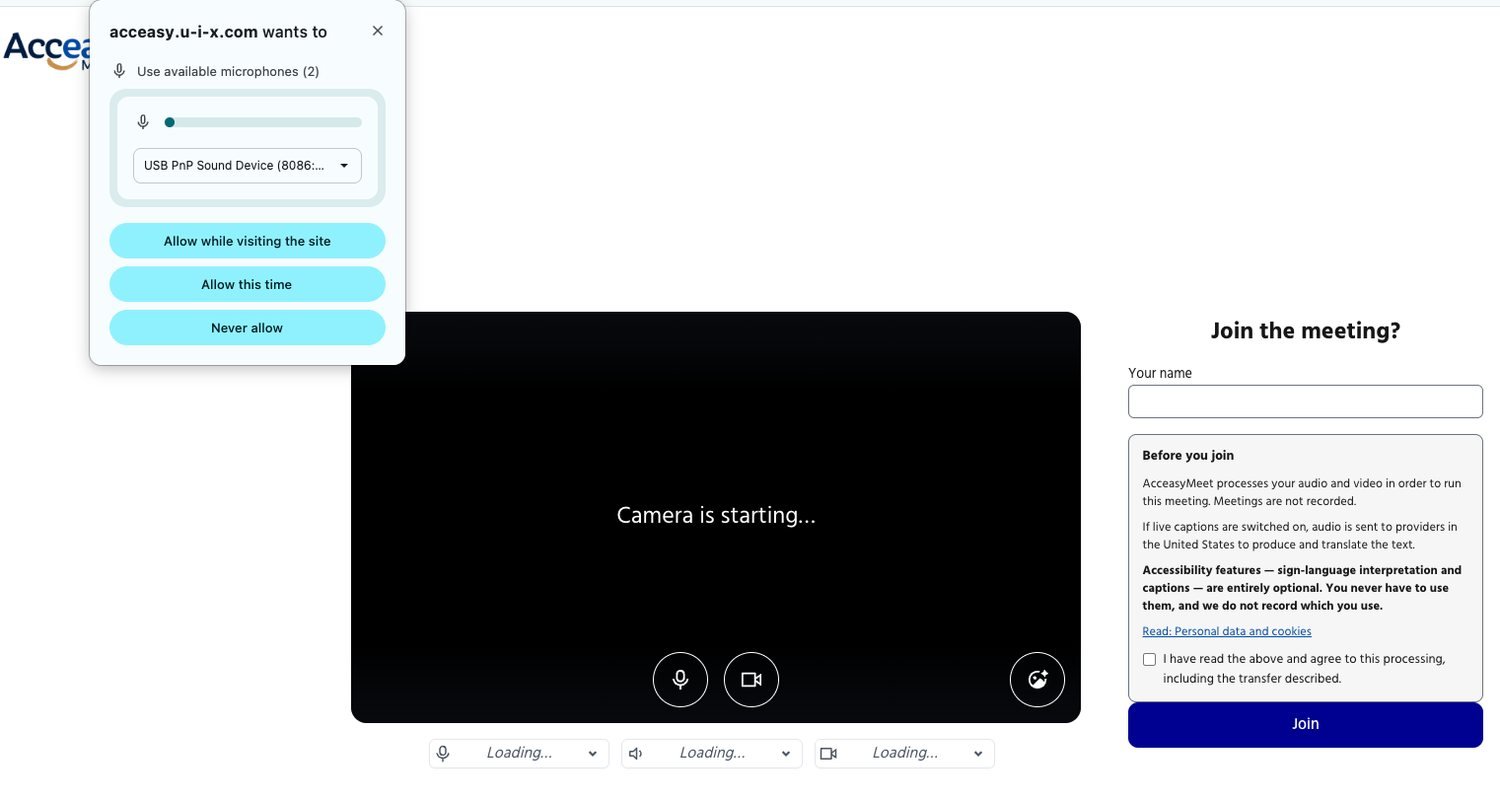
On this screen you can:
- Preview your camera before anyone else sees you.
- Pick your microphone, speaker and camera from the three device menus underneath the preview.
- Enter your name. This is what everyone else will see, so use something they will recognise.
- Apply a background effect with the effects button on the preview — see Backgrounds and effects.
Agreeing to the privacy notice
Below the name field there is a short Before you join notice and a checkbox. You have to tick the box before the Join button will let you in. The notice tells you, in plain terms:
- your audio and video are processed in order to run the meeting, and meetings are not recorded on this installation;
- if live captions are switched on, audio is sent to providers in the United States to produce and translate the text;
- the accessibility features — sign-language interpretation and captions — are entirely optional, and the system does not record which ones you use.
If you would rather read the detail first, the Personal data and cookies link in the notice opens the full policy in a new tab.
The tick is required, not a formality
Clicking Join without ticking the box will not let you in — the checkbox is outlined in red and you are asked to tick it. This applies on every route into a meeting, including password-protected rooms and rooms with a waiting room.
If you have to wait
Three things can hold you outside the meeting for a moment. None of them means anything is broken.
The host has not started the meeting yet
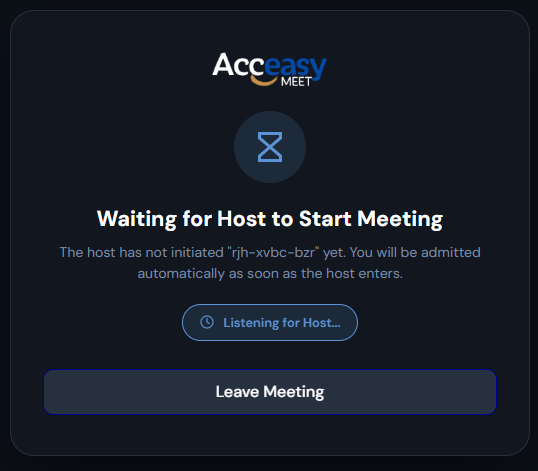
If you arrive before the host, you will see Waiting for Host to Start Meeting. There is no need to refresh — you will be let in automatically the moment the host arrives. If the host's connection drops briefly, a 60-second grace period lets them return without turning anyone out.
The meeting has a password
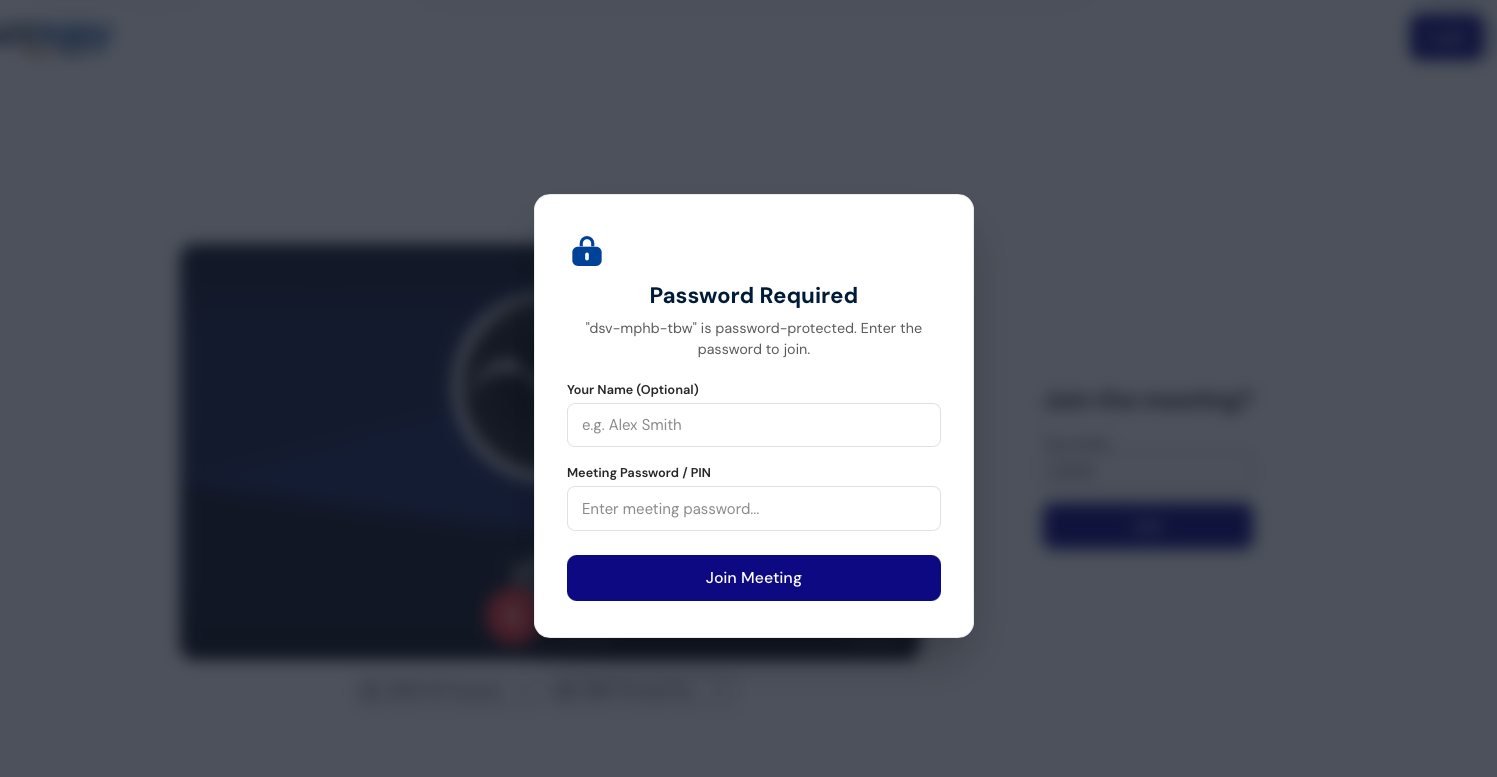
Some meetings are protected with a security PIN. Enter the password the host gave you — it is usually included in their invitation — and you go straight in. No account is needed. If the password is wrong you are told so and can try again; only the host can give you the right one.
Interpreters skip this step
A sign-language interpreter's private link carries its own credentials and bypasses the password entirely. If you are interpreting, see the interpreter guide.
The meeting needs the host's approval
If the room is restricted, you will see Requesting to join… while the host decides. Three things can happen:
| Outcome | What you see |
|---|---|
| Accepted | You are admitted into the meeting. |
| Declined | “Your request to join has been denied.” |
| No answer in 10 minutes | “No one responded to your request.” |
Reloading the page while you wait does not send you to the back of the queue — you keep your place.
Your controls
The control bar sits along the bottom of the meeting. Everything here is available to any participant unless noted.

| Control | What it does |
|---|---|
| Microphone | Mute and unmute. The arrow beside it opens your microphone and speaker pickers. |
| Camera | Turn your video on and off. The arrow opens your camera picker plus Backgrounds and Effects. |
| Reactions | Send one of eight emoji into the meeting. |
| Share screen | Opens your browser's screen, window or tab picker. Hidden entirely in browsers that cannot do it. |
| Captions (CC) | Turns live captions on and off. |
| Caption language | A separate button beside CC: choose the language being spoken and the language you want to read, plus caption text size. |
| Language | Show or hide sign-language interpreter overlays. Only appears once an interpreter has actually gone live — see watching an interpreter. |
| Raise hand | Raises your hand for the host. If you start talking with your hand still up, you get a gentle nudge asking whether you meant to lower it. |
| Layout | Cycles through Gallery, Speaker and Custom view — see choosing your view. |
| Hide cameras-off | Hides everyone whose camera is off, giving the people you can actually see more room. |
| More options | Picture-in-picture, fullscreen, effects and settings. |
| Leave | Leaves the call. |
A greyed-out button is usually the host, not a fault
Hosts can switch off everyone's microphone, camera or screen sharing for the whole meeting. If one of your buttons is unavailable, that is normally why.
You may also briefly see an allow media playback button. Some browsers block audio until you interact with the page; clicking it once is all it takes.
Chat, participants and the admin panel
These sit in their own cluster on the right-hand side of the bar. Chat and Participants are open to everyone; the admin panel is only visible to hosts. On a narrow window the cluster collapses into a single up-arrow button that opens them as a small menu — this is a different menu from More options, which is easy to confuse. The whole bar wraps onto two rows rather than clipping when space runs short.
The More options menu
- Help & guides — opens this help centre in a new tab.
- Picture-in-picture — pops the meeting into a small floating window. Chrome-family browsers only.
- Fullscreen
- Backgrounds and Effects — see below
- Settings — including the accessibility options
- Support and Send feedback may also appear, depending on how the installation is configured.
The interpreter comes with you
A live sign-language interpreter is shown inside the picture-in-picture window, sized to it, so you can work in another app and keep watching. Hiding an interpreter with the Language button hides them in the pop-out too.
On a phone or tablet
The main row carries: leave, microphone, camera, reactions, the Language button, captions, caption language, raise hand, and a single ⋯. Mobile microphone and camera buttons have no arrow menus — device pickers and effects live in the ⋯ sheet instead, along with screen sharing, chat, participants, layout, hide cameras-off, help, settings, and switch camera for front and back.
Choosing your view
This is entirely personal. Nothing you change here affects what anyone else sees.
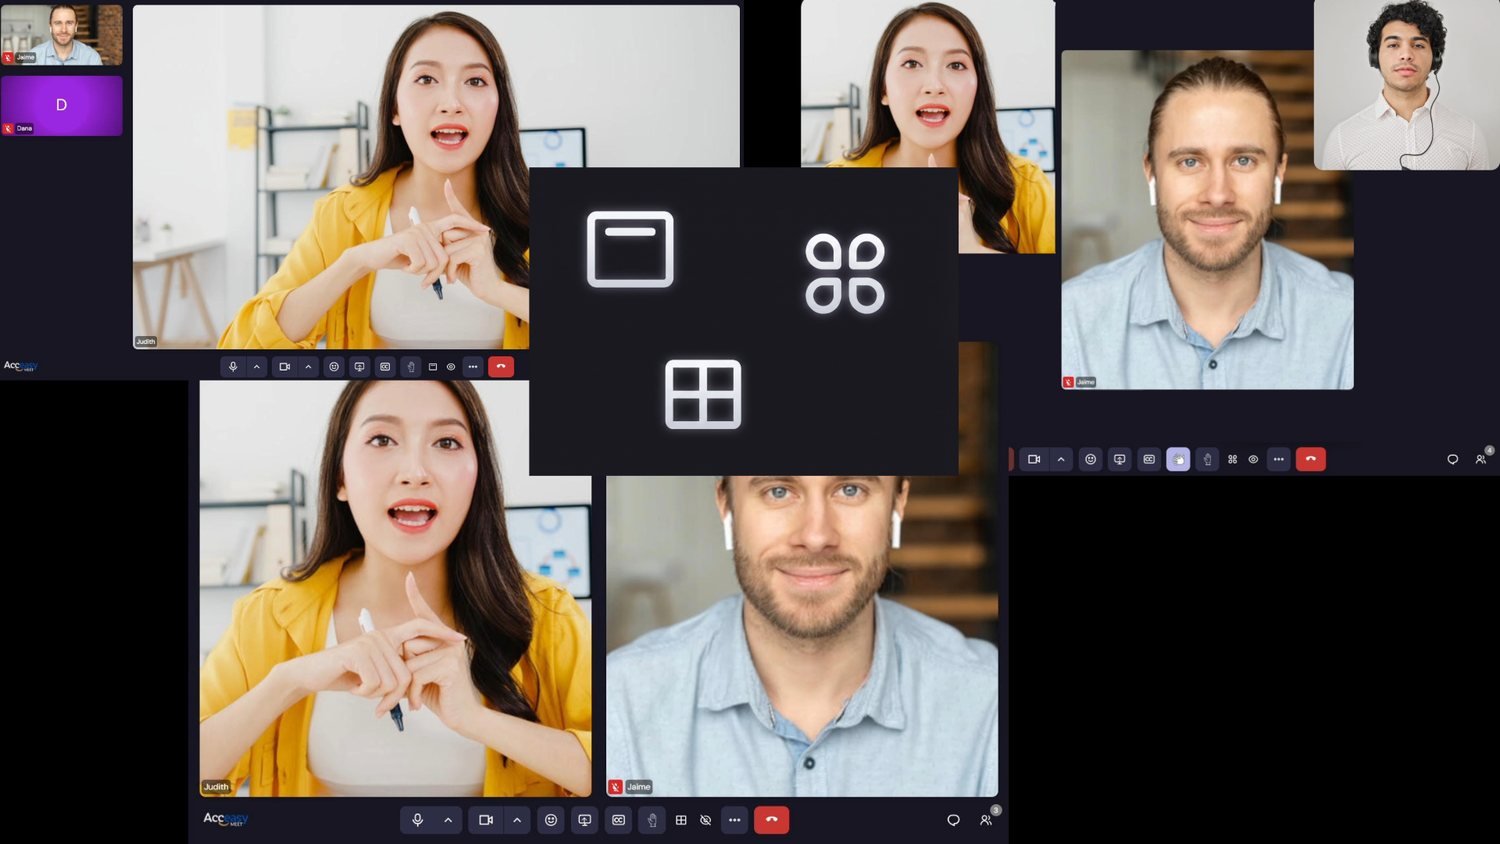
| View | What you get |
|---|---|
| Gallery | The familiar grid — everyone the same size. |
| Speaker | One large stage with everyone else in a filmstrip. The stage fills immediately; you do not have to wait for someone to speak. |
| Custom | Drag tiles anywhere you like. They stay where you put them, and the arrangement is remembered per person — someone who leaves and rejoins returns to their spot. |
When a host spotlights someone
A host can put up to two people on everyone's stage at once — an interpreter and a speaker, for example. When that happens your view follows the spotlight, but you are not locked in: you can still switch layouts and move tiles. The spotlight decides who is featured, not how you look at the meeting. If you join after a spotlight was set, you get the current one automatically.
Interpreter overlays are separate
A sign-language interpreter is not a tile in any of these layouts — they float above the meeting in their own window that you can move and resize. Changing layout never hides them.
Live captions and translation
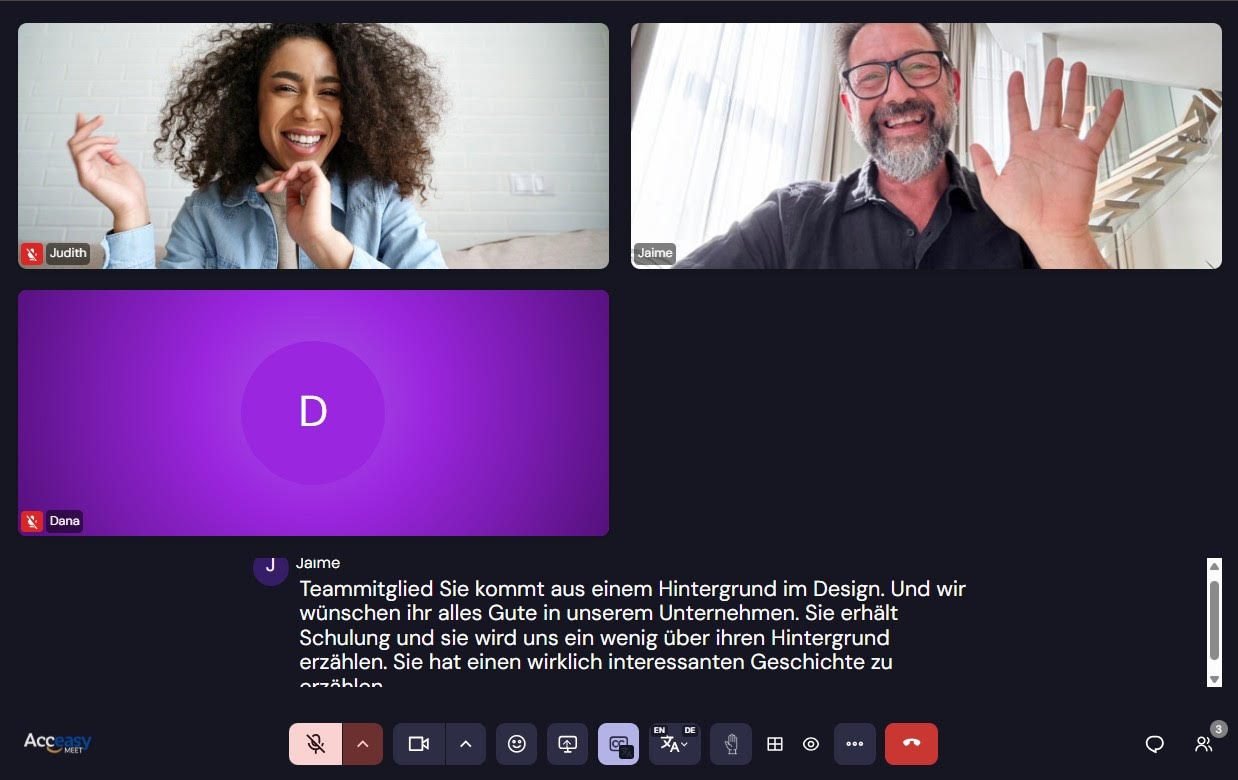
Acceasy Meet transcribes the meeting as it happens, labels each cue with who said it, and can translate it into a different language for each participant independently. You and the person beside you can be reading the same conversation in two different languages.
Turning them on
-
Click CC in the control bar. Captions appear straight away.
-
Open the caption language button next to it to choose your languages.
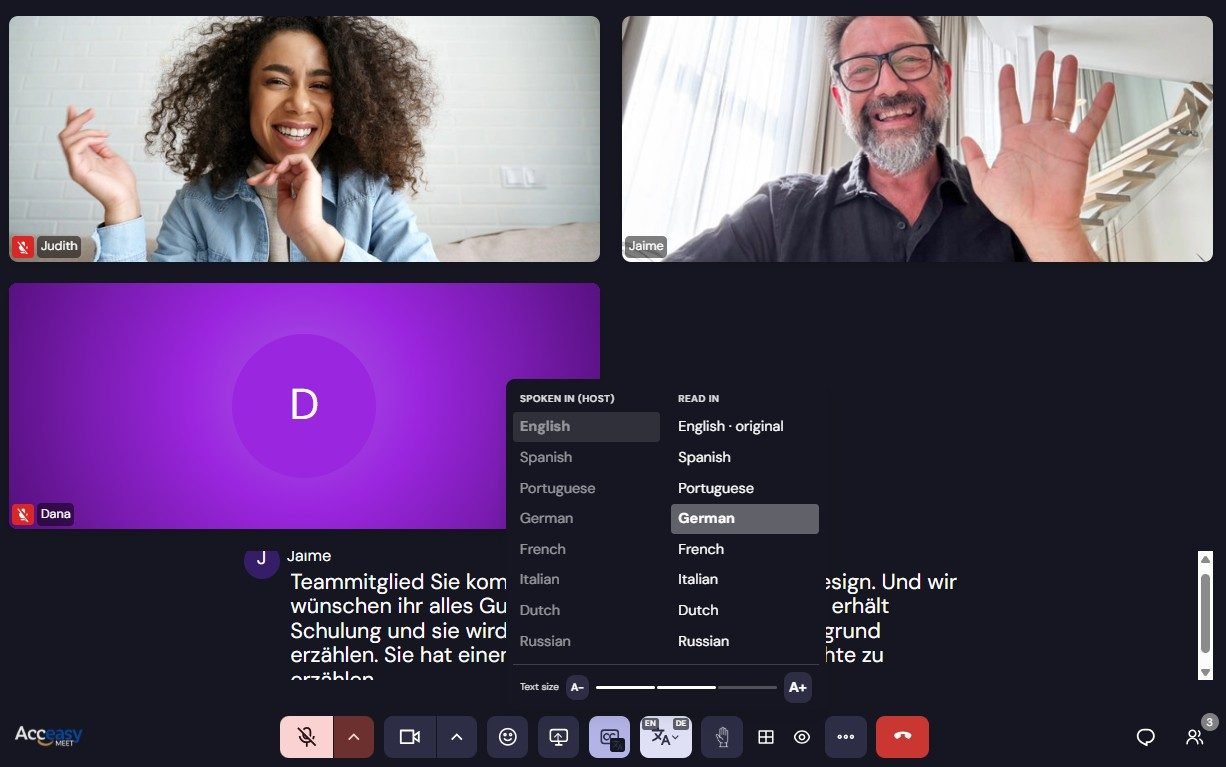
Set “Spoken in” to match what people are actually saying
This is the single most common reason captions come out poor or empty. The spoken language tells the recognition engine what to listen for — if it is set to English and the meeting is in Spanish, the result will be unusable. The Read in column is separate and only affects you.
The original speech appears almost instantly; the translated version arrives a moment later. Text size is adjustable straight from this menu with A− and A+, and the colours are in accessibility settings.
Everyone in the meeting can see a persistent notice while transcription is running, so nobody is captioned without the room knowing.
Meetings with two spoken languages
Each person simply speaks their own language whenever they want to, and everyone else reads it in theirs. Nobody switches anything during the meeting, nobody waits for a turn, and the host does not have to manage who speaks when — it is set once, at the start, and after that the conversation just flows.
When this helps
- Two language groups, one conversation — a Spanish-speaking team and a Portuguese-speaking team, say. Anyone talks at any moment in their own language; the other group follows in the captions. No pausing for consecutive interpretation, no “could you repeat that in English”.
- A meeting with families, clients or patients who speak another language — English-speaking teachers and Spanish-speaking parents, for instance. Each side speaks naturally and reads the other.
- A guest speaker in another language — add their language for that meeting, then remove it afterwards so a one-language meeting goes back to its best caption quality.
- Together with a sign-language interpreter — the interpreter overlay works independently of captions, so Deaf participants can watch the interpreter while hearing participants from both language groups read captions, all in the same meeting.
What to expect: captions are text — you read the other language, you do not hear a dubbed voice. Up to two languages can be spoken in a meeting, and each reader can still choose any available reading language, so a third person can read both sides translated into, say, French. Translated lines arrive a moment after the speaker finishes their sentence.
Some meetings genuinely have two sides — a Spanish team and a Portuguese one, say. The Spoken in column lets a host pick up to two languages, and both sides are captioned. Click a language to add it, click a selected one to remove it; with two already chosen, picking a third replaces the second, so no click in that column does nothing. Only a host can change it.
Both of the spoken languages are then marked · original in the Read in column, because both sides are somebody's own words. Nothing changes for you as a reader: pick one language and you get it — the people who spoke it as they said it, everyone else translated. The provisional words that appear while a sentence is still being spoken are only shown to readers of that speaker's own language, because those are never translated.
If one person keeps being captioned in the wrong language, a host can open the ⋯ menu beside their name and set Spoken language for them specifically, instead of leaving it on Automatic. The system normally works out who speaks what within a few sentences; a strong accent is exactly where it can keep guessing wrong.
Pick two languages only if two are really spoken
This is an honest trade rather than a free upgrade. A second allowed language is also a second way for the recognition engine to mishear background noise as speech, and Spanish and Portuguese are the pair it confuses most easily. A meeting that is really in one language gets measurably better captions with one language selected.
Watching a sign-language interpreter
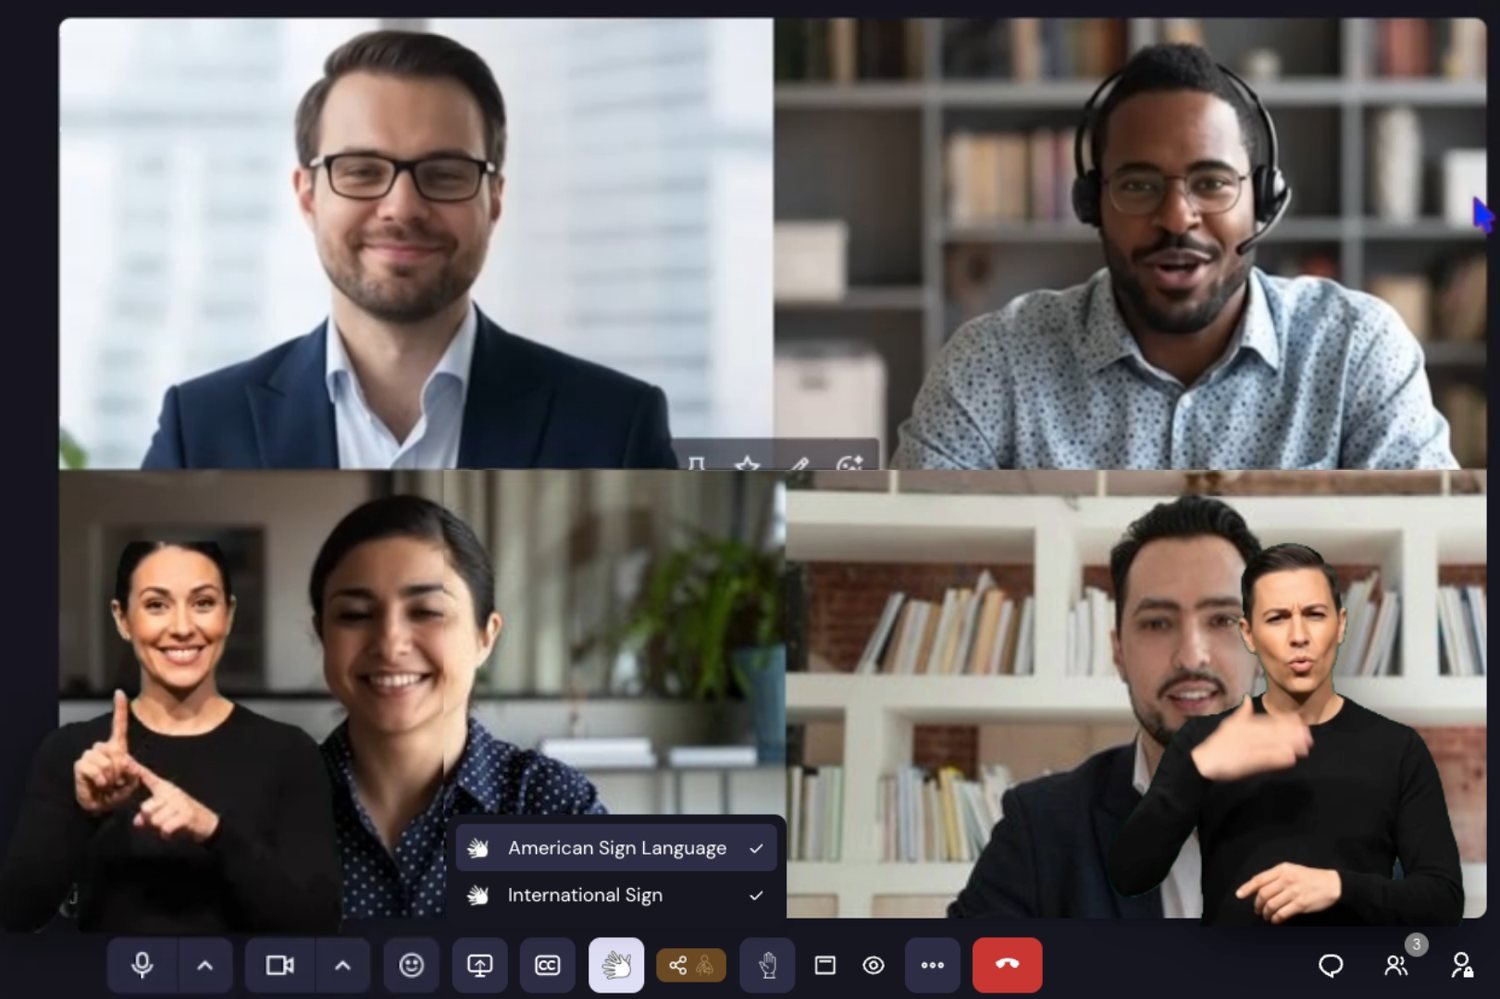
An interpreter appears as a floating video window with their background removed, rather than in the participant grid. You control your own view of them completely independently — nothing you do here affects anyone else.
The Language button
A hand-icon button appears in your control bar only once an interpreter has actually gone live. Before that there is nothing to show, so the button is not there at all.
- One sign language present — the button is a simple on/off switch. Tap to show the overlay, tap again to hide it.
- More than one — tapping opens a menu with one row per language. Turn each on or off independently.
Why two interpreters can share one row
If two interpreters are covering the same language, they are almost certainly relaying — taking turns so neither has to interpret non-stop. You see that as a single row with a small count, not two options to choose between. Interpreters covering genuinely different languages each get their own row.
Using the overlay
The overlay is yours to arrange. The controls fade out after a couple of seconds so they do not clutter your view; move your mouse over the overlay to bring them back.
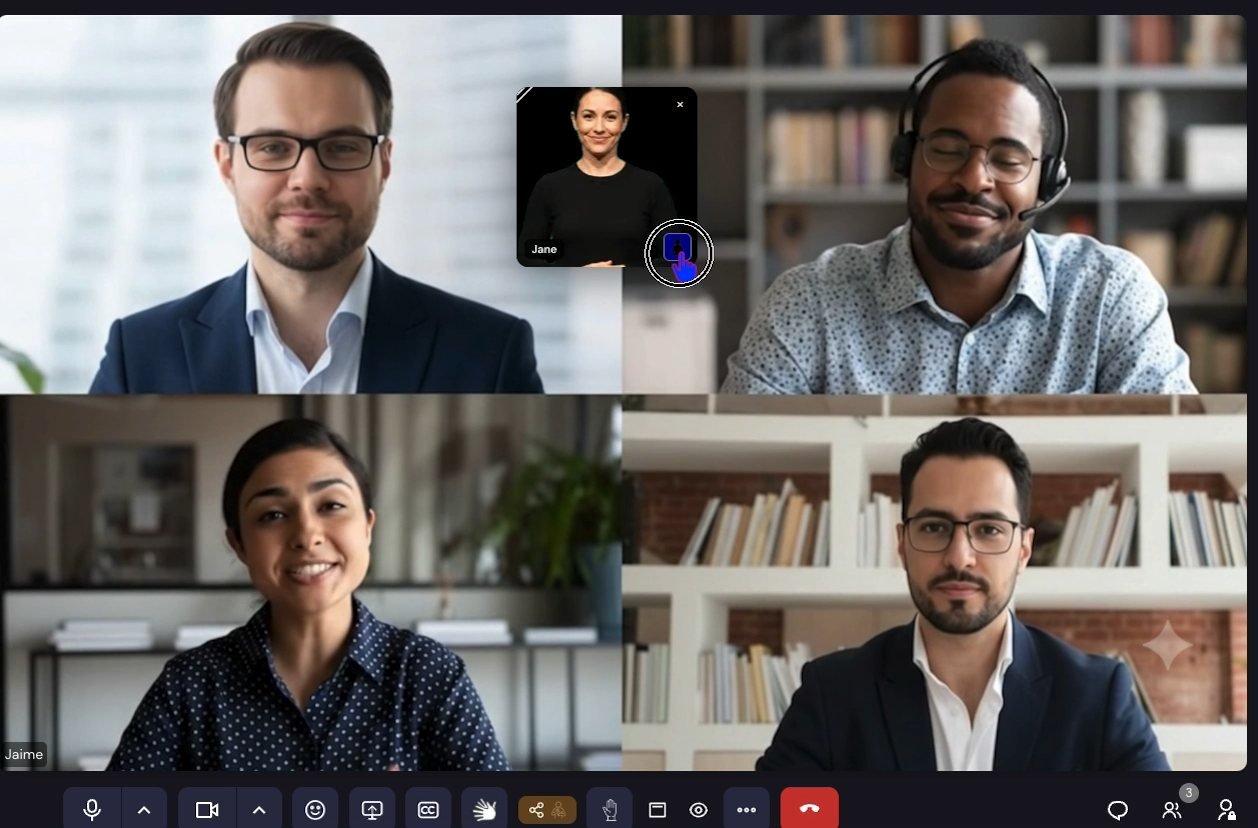
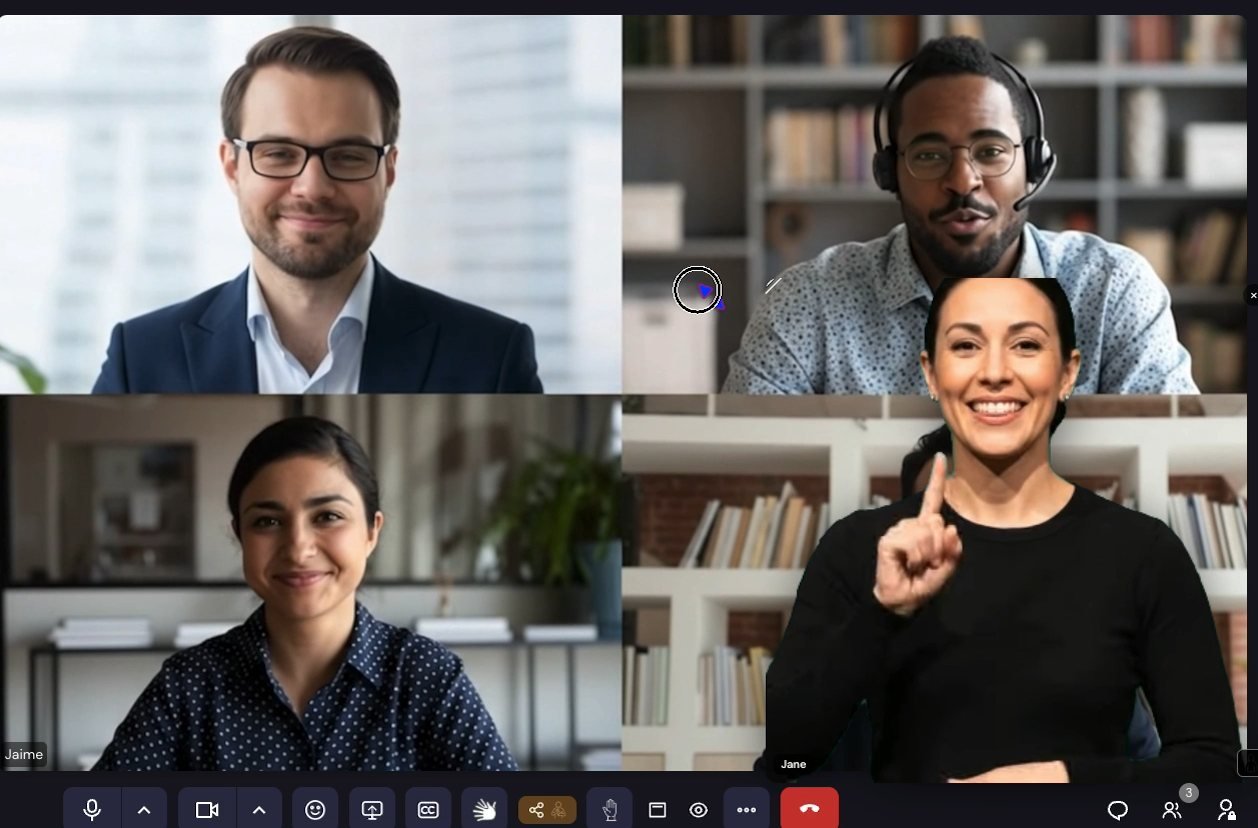
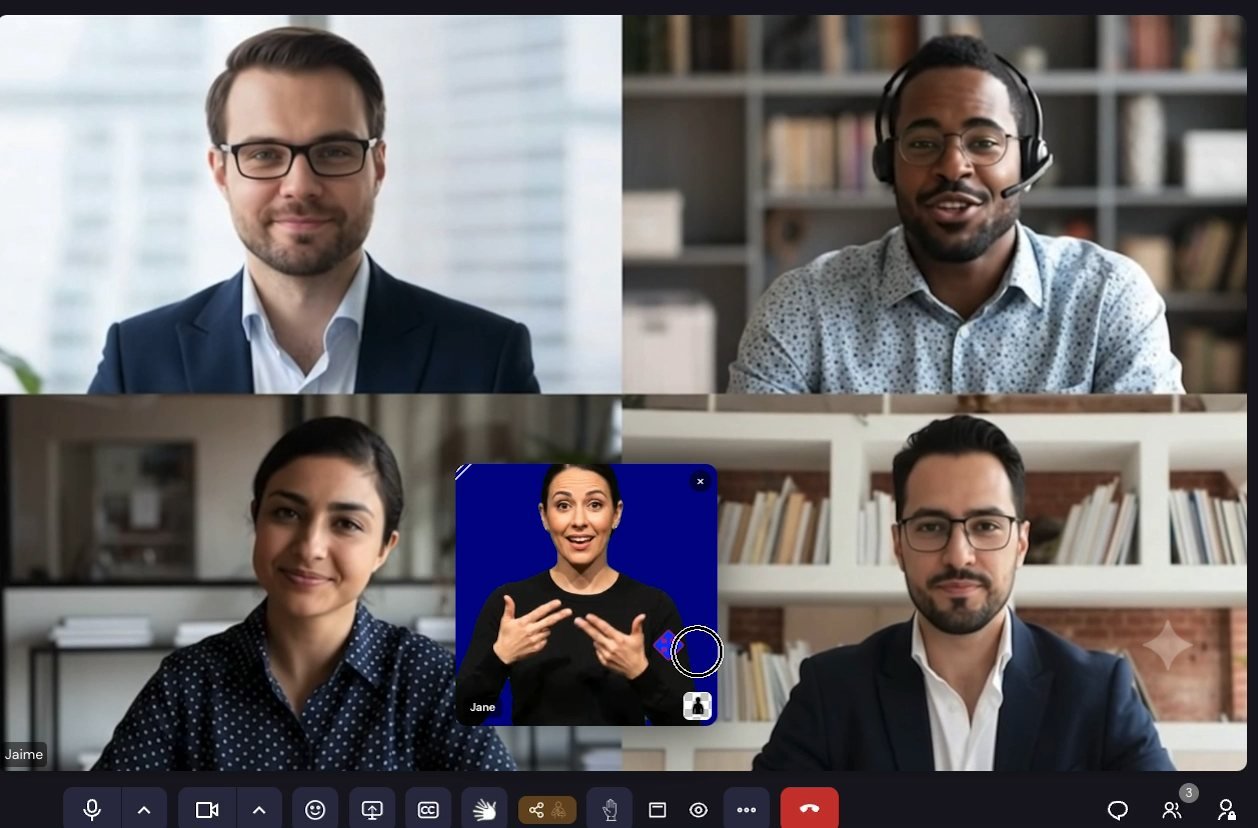
Closed it by accident? The × in the corner hides the overlay, and the Language button brings it straight back — for that specific language, without reloading or hunting around. Right-clicking the overlay shows credits and version information.
Not available yet
Pinning the overlay, a dedicated fullscreen for it, an opacity control, and keyboard shortcuts for the overlay or the Language button do not exist today. The overlay is mouse and touch only.
Chat
Text-only messages, visible to everyone currently in the meeting. Links you paste become clickable automatically, and new messages show as an unread badge while the panel is closed.
Nothing is saved
Messages are visible to participants only at the time they are sent, and all messages are deleted when the call ends. There is no history to scroll back to afterwards, and no file attachments — text only. Pasting or dropping an image into the meeting shows a short reminder of this instead of doing anything; to show an image, share your screen.
Accessibility settings
Open ⋯ More options → Settings → Accessibility.
Interface font
Swaps the font of the entire interface, not just the captions: Default, Lexend (improved general readability), Atkinson Hyperlegible (designed for low vision) and OpenDyslexic (designed for dyslexia).
Caption styling
These control how captions look — not whether they are on, and not what language they are in.
- Text size — small, medium or large.
- Font colour — nine options.
- Background colour — nine options.
If captions are hard to read against busy video, a solid background colour with a high-contrast font usually helps more than size alone.
Spoken announcements
Announce reactions aloud makes reactions readable by screen readers instead of appearing only visually. It is off by default — switch it on if you want it. Raised hands are announced to screen readers regardless of this setting.
Backgrounds and effects
Reach these from the arrow beside your camera button, or ⋯ → Backgrounds and Effects. You can apply one before joining from the pre-join screen, or at any point during the meeting.
- Blur — two strength levels.
- Eight built-in virtual backgrounds.
Custom uploads are switched off here
Uploading your own background image is turned off on this installation, for everyone. Only the built-in presets and blur are available. Browsers that cannot run the effects show a message suggesting Chrome or Firefox instead of the panel.